Friday, August 31, 2012

Earth Friendly Friday - with Authentique

Hi Everyone - did you miss me?  I took an unexpected bloggy break over the last week or so.  Busy with getting my little critter ready to start school, and just squeezing in as much last minute summer fun as possible.  I think the little break did me good (and the kids certainly weren't complaining, ha ha!)

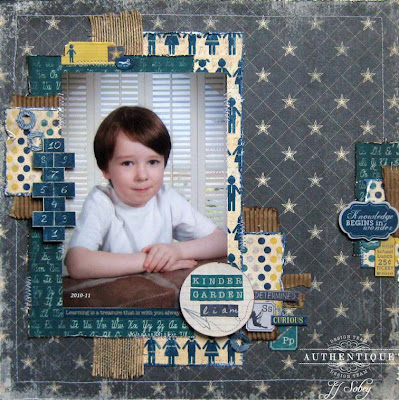
At any rate - I would like to share with you my first "Earth Friendly Friday" Authentique project.  Anyone who knows me, knows that I have a Starbucks addiction.  I generally bring my own travel mug with me, but when I forget, I make sure to save the coffee sleeves. 


They have a great texture - I really like the small-scale corrugation for using on scrapbook layouts.  It's a very boy-friendly colour too, and turns out it goes perfectly with the Authentique "Curiosity" collection.


The coffee sleeve adds some depth, so I added Helmar Zap-dots to some of the sticker Elements to make them stand out more.  Adding height to the Elements I want to emphasize, makes the cardboard visually recede a bit (you don't want it to be the first thing you see).


The thick Authentique papers really stand up to distressing, so I like to take advantage of that.


Having a variety of sizes in the sticker elements makes it easy to create embellishment clusters.   I slipped in a little more of the coffee sleeve here, too.


Thanks for visiting!

Supplies (Authentique):
Curiosity "Studious", "Determined", "Learning", "Academic", Details stickers, Elements stickers

Helmar Adhesives:
Zap-Dots
Premium Craft Glue
450 Quick Dry

Other Supplies
trim - Green Tara
ink - Ranger
staples - Tim Holtz
marker - Staedtler
other - coffee sleeve, denim

Thursday, August 16, 2012

Bonne FĂȘte ma Belle Princesse - birthday card with Authentique & Basically Bare


This week the Authentique team is mixing in some Basically Bare products.  I love anything kind of embellishment I can customize, so this was right up my ally.

I started with the "Lively" collection, and made this card for my daughter's birthday.  (The sentiment translates to "Happy Birthday, my Beautiful Princess".   I love the way the Authentique paper distresses.


The dress is made from Basically Bare 'dress' embellishments in felt and canvas.  I sprayed them both with glimmer mist (the canvas is a darker shade), and then added some brown mist with a stencil.  Then I cut and folded back the canvas and adhered to the felt, and added some green trim.


Thanks for visiting!

Authentique ("Lively" collection):
papers - "Vivacious", "Bright"
letters - "Lively" elements
stickers - "Lively" Details

Basically Bare:
Basically Embellies Dresses (felt & canvas)

Other Supplies:
7mm Loop Trim (Olive) - Green Tara
15mm Flower Edge Organza (Pale Pink) - Green Tara
Helmar Professional Acid Free Glue
Helmar 450 Quick Dry Adhesive
Helmar Liquid Scrapdots
glimmer mist (Black Cherry, Party Pink, Decadence Chalkboard) - Tattered Angels
stencil - Donna Downey by Prima

Monday, August 13, 2012

Hot Air Balloon Wedding Decoration - Ruby Rock-it & Helmar


This is a mini-hot air balloon wedding decoration I made for the Ruby Rock-it booth at CHA.   It's only about 8 inches high.  I used papers from the Bella! Wedding "Smitten" line.   If it wasn't for Helmar, I would have burned the @#$^%$* out of my fingers with hot glue for this thing.  So I'm super duper happy I had the 450 Quick Dry.  Just sayin'


All the bling is from the Bella! Bling borderlines packs.  Where you see single pearls or gems, I just cut them from the strip, and adhered where I wanted them.


Trims and organza brads from the Bella! Wedding collection finished it off.


Thanks for visiting!

Supplies (Ruby Rock-it):
Bella! Wedding "Smitten" papers
Fundamentals trims "Silver"
Bella! Wedding trims "White"
Bella! Bling Borderlines "Clear"
Bella! Bling Borderlines "Pink"
Bella! Wedding Organza Brads

Helmar Adhesive:
450 Quick Dry

Other Supplies:
styrofoam ball
toilet paper roll

Thursday, August 9, 2012

Floral headband - Green Tara & Helmar


Today I wanted to share a tutorial for a floral headband, featuring flowers and trims from Green Tara.   I started with a simple plastic headband:


First, I adhered 15mm Double Sided Satin Ribbon to the outside.  The edges will stick out a bit, but that's OK...


Because the next step is to wrap the entire headband with 9mm Satin Edged Organza.  It will hold the previous ribbon's edges exactly where you want them, while creating a pretty stripe.  I tucked under the ends and glued.


Next, you can start decorating with pretty flowers and embellishments. Glue everything with your favorite liquid adhesive (I used 450 Quick Dry). I started with this 8cm Velvet Rose:


Then added a 5cm silk Sakura:


Next, a few smaller flowers, such as these 3cm Organza Pearl Flowers:


Then finish it off with some leaves or greenery.  I chose to cut apart one of the 21cm Silver/Acrylic/Spray - Flowers and Leaves. You can one of the leaves here:


And in this shot you can see more of the beaded part from the spray:


I hope you'll take a peek through your stash and give this a try.  Send me a link if you do - I would love to see it!

Despite the look on her face, she was pretty excited about the head band (she just wasn't excited about the camera...)  ;)


PS - if you haven't joined us on Facebook, please pop on over and 'like' Green Tara!

Supplies (Green Tara):
15mm Double Sided Satin Ribbon Lavender (RB15Lav)
9mm Satin Edged Organza White (RB16Wh9)
Velvet Rose 8cm Lavender  (XF9217L)
Sakura 5cm Silk and Pearl Flowers Lilac (XF9221L)
Organza Pearl Flowers 3cm White (XF5034Wh)
21cm Silver/Acrylic/Spray - Flowers and Leaves (XP0636)

Helmar Adhesive:
450 Quick Dry

Other:
plastic headband

Tuesday, August 7, 2012

Morning Out - scrapbook page with Helmar, Susan K Weckesser and Unity Stamps


This month we've had a cross-promotion with Helmar, Unity and Susan K Weckesser, and this is my participation.  It's also part of the Helmar August Challenge - I hope you'll check it out and join us!


Of course, I used the Susan K Weckesser papers for my page - love these papers!  I glued all the papers using Premium Craft Glue.   The photo over the heart needed a little extra lift in the centre (to bring it to the same height as the chipboard), so I used Zap Dots.


I used Faber-Castell Gelatos to colour the chipboard and the canvas banner shapes.  The banners were also stamped with Unity Stamps for a little texture.


And to finish it off, all the canvas and embellishments were adhered with 450 Quick Dry, which is perfect for lumpy or textured embellishments.  I tucked a few Green Tara flowers around the page as extra layers.


Supplies:
Helmar 450 Quick Dry
Helmar Premium Craft Glue
Helmar Zap Dots
Susan K. Weckesser papers
Unity Stamps
Faber-Castell gelatos
Faber-Castell PITT pens

Other supplies:
flowers - Green Tara
canvas banners - Maya Road
flare - Evalicious
wood camera - Studio Calico
bird - Websters Pages
chipboard heart - Scenic Route
twine - Hemptique
letters - American Crafts
ink - StazOn
gesso - DeSerres
other - staples

Friday, August 3, 2012

Faber-Castell WINNER, plus some Authentique news!

I did a random draw, and Random.org picked:

Blogger Lee-Anne said...
Love your art journal page JJ! I haven't worked in mine in quite a while and you have inspired me.
July 27, 2012 9:20 PM

Lee-Anne - please email me at   kilroy @ videotron . ca   (remove the spaces), with your shipping information, and I will get this in the mail to you!


And now for the announcement - I've joined the design team at Authentique Paper!


You can read the announcement here.  I'll admit, I'm still a little shocked.  But I'm super excited about this opportunity!

Wednesday, August 1, 2012

"Still a Soft Place" - scrapbook page with Love My Tapes


Here's another page I created for the Love My Tapes booth at CHA.  They asked us to focus on the washi tapes, so I kept it simple.  Of course, that doesn't mean I could resist using a little mist and a new stencil from Artist Cellar.  ;)


For the blue circles, I placed strips of washi tape on scrap cardstock, then used circle punches.  The flowers were created in a similar fashion, only this time with fabric tapes, and a die-cutter.  Easy ways to make your tapes take centre stage.


Thanks for visiting!

Supplies (Love My Tapes):
washi tape - brown grid, blue sky
fabric tape - Emma mini mums (#FT006)

Other Supplies:
PP - Basic Grey (background)
mist - Tattered Angels
stencil - Artist Cellar
pearls - Ruby Rock-it
letters - Lily Bee
marker - Faber-Castell