Friday, September 30, 2011

Treat Time


Yes, even messy, inky, grungy scrappers like me, still like Doodlebug. This was one of those "I wonder what would happen if..." layouts, a challenge to myself if you will. You see, I used to fancy myself to be a 'clean & simple' scrapper. You can stop laughing now. At any rate, I still have quite a few Doodlebug products in my stash, and I'd almost forgot about them. I can see that I need to dig out some of these things more often (I'm so in love with their jewels!).

The background received a good dose of gesso before I started layering papers on top. I wanted to create a more neutral backdrop for the photo grouping, without going to plain cardstock. I'm very happy with the result, and I will try this technique again.


I love the turquoise flocked paper. I need to remember I own this! Oh, and flocked letters - yum!

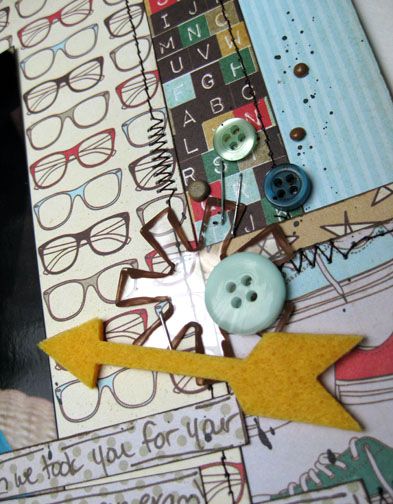
Lots of ink splats and machine stitching in black, to give a little pop amidst all the loud colours.


It's fun to step outside of your comfort zone, and rediscover old scrappy loves at the same time.


What products are sitting unloved in your stash?

Supplies:
PP, buttons, jewels, letters, border strips (frills) - Doodlebug
gesso, acrylic ink - Liquitex
markers - Staedtler, Faber-Castell

Wednesday, September 28, 2011

Pencil Case - Tattered Angels & Prima Mist-ables


The Tattered Angels team were given these Prima 12×12 Mist-able canvas sheets to work with this month. When I see fabric, including canvas, it’s hard for me to leave it flat, so in this case I cut it up and sewed myself a little pencil case.

I misted the canvas with Patina, Cranberry Zing, Suede and Bronze glimmer mists, while it was still flat (just easier that way) and the zipper as well, so it would match. When it was dry I sewed it up.

The Prima lace was misted with Patina. This canvas butterfly is one of the Prima Resist Mist-ables, and was treated to Cranberry Zing, and some Prima jewels.


The flower cluster features some Prima fabric flowers and canvas Mist-ables. I used Cranberry Zing on the large canvas flower, Patina on one of the fabric flowers and the smaller canvas flower, and the last flower was misted with Bronze and edged with Cranberry Zing. The Prima jewels and pearls were given a little extra stick with fabri-tac, since this case will see a lot of use.


I lightly brushed all the edges with Chandelier glimmer glam to prevent fraying. It worked a treat, and added a little extra shimmer.


What would you make if you had one of these sheets? :)


Supplies (Tattered Angels):
Glimmer Mist - Patina, Cranberry Zing, Suede, Bronze
Glimmer Glam - Chandelier

Other Supplies:
canvas sheet, canvas flowers, fabric flowers, lace, jewels & pearls - Prima Marketing
other - zipper

Monday, September 26, 2011

Butterfly


Hi everyone - time for another sketch challenge over at Let's Capture These Sketches. I hope you will hop on over to their blog to see what the rest of the team has created.

For this layout I wanted to really bring in a softness to the halloween theme by adding flowers and lots of lace. These laces are from Love My Tapes. I used 3 different laces, but it's not overwhelming because they are all the same shape, creating repetition.


I had been hoarding this chipboard fence for a couple of years I think - so glad I finally dug it out and used it. It's been sprayed with glimmer mist in Raven and Haunted Shadows.


I added the Prima halloween vine to make sure it didn't get too 'pretty' for a hallowe'en page. I like the balance between this and the flowers.


I cut out my title and mounted it on pop-dots to make it stand out a little easier.


Supplies:
PP - Fancy Pants
lace - Love My Tapes (12mm lace light green, pale pink, black)
letters - Basic Grey
chipboard - Riff Raff
flowers, vine - Prima Marketing
jewels - Doodlebug
glimmer mist - Tattered Angels (Haunted Shadows, Raven)
marker - Faber-Castell PITT pen
ink - StazOn

Saturday, September 24, 2011

Histoires de Pages #42


I have a layout in the newest issue of Histoires de Pages, a fabulous magazine from France. (Page 44, if you get this mag). :)

Thursday, September 22, 2011

Voici comment dort un ange

This layout was published last year (Aug 2010) in "Histoires de Pages", my favorite scrappy magazine. The title translates to "This is how an Angel sleeps".

I fussy cut a couple of butterflies, adhered with pop-dots, and added glossy accents to them.


The flower borders are a bunch of flowers cut in half. I tinted them with several shades of glimmer mist to get them to match the layout.

The journaling talks about how it's so hard to get a picture of my daughter sleeping, because she's a very light sleeper. This particular day she was so tired, after she fell asleep in my arms, I was able to transfer her to the couch without waking her (a rarity, indeed).


Supplies:
PP, letters, flowers, pearls - Prima Marketing
glimmer mist - Tattered Angels
ink, glossy accents - Ranger
marker - Staedtler Triplus Fineliner

Tuesday, September 20, 2011

Specs


This paper collection from Fancy Pants is a school themed line. But I was immediately drawn to the paper with all the eye-glasses - perfect for a page about my son now needing to wear them.

The sewing machine saw some action on this layout. Seems I've been doing that more often lately. When it comes to markers, I'm not really a doodler, but thread... whole other story.


Whenever I work with Fancy Pants papers, I'm reminded to dig out my stash of felt. They made so many cool shapes, and I'm always happy to find that some of the colours still work with a current collection. Good thing - 'cause I went a little nuts over the felt... just sayin'...


A little acrylic paint around the edges makes the acrylic shapes stand out. And it's always fun to flick a little ink around on a page, too. ;)


A close-up on the journaling:


Supplies:
PP, felt, acrylic shapes - Fancy Pants
letters - American Crafts
buttons - Autumn Leaves
brads - Queen & Co, unknown
acrylic paint - Decoart
acrylic ink - Liquitex
marker - Faber-Castell PITT pen

Sunday, September 18, 2011

School's Out 4 Summer - Tattered Angels

This month for Tattered Angels we are partnering with Prima Marketing, showing how well these products work together. I started with a Prima patterned paper from the “Shabby Chic” collection, and misted it with Tattered Leather, using the Prima brick stencil. (The grey lined paper is from the Prima “Youth” collection). Then I started on the rest of the page with the “Hummingbird” paint system.

The corrugated cardboard received a generous dose of Espresso Bean glimmer glam (this colour has my name all over it, just sayin’…). Glimmer Glam is awesome on corrugated – the shimmer just stays on the surface, it’s gorgeous while still masculine.


The wooden cogs from Scrap Désirs were misted with Bronze glimmer mist for just the right amount of shimmer.

I stamped the Prima canvas tapes with a Prima stamp, and Espresso Bean glimmer glam. Then I spritzed it with Bronze glimmer mist. (The blue tapes were painted with Waterfall glimmer glaze, instead of the mist). The Prima canvas letters were painted with Rum Punch glimmer mist and the clock mist-able was misted with Suede glimmer mist.

The key and lock mist-ables were coloured with Bronze glimmer mist and Charcoal chalkboard mist, respectively. The flourish paper is another one of the Prima paintables, which I painted with Rum Punch and Bronze glimmer mists.

The pocket watch and bug mistables received more of the Suede glimmer mist and Charcoal chalkboard mists. (The charcoal came out on the grey-side because I dabbed away a lot of the colour while it was still wet – I didn’t want it too dark).


And the story. I'm glad I had this piece of older Prima paper - it was perfect for a school layout!


Supplies (Tattered Angels):
Glimmer Mist - Tattered Leather, Rum Punch, Suede, Bronze
Chalkboard Mist - Charcoal
Glimmer Glam - Espresso Bean
Glimmer Glaze - Waterfall

Other supplies:
PP, paintable paper, mistable canvas, canvas tapes, canvas letters, stamps, felt, stencil - Prima Marketing
corrugated cardboard - DeSerres
wood gears - Scrap Désirs

Wednesday, September 14, 2011

Treasure


I just love this photo of my little munchkin. There were nicer shots of the dress, but there wasn't a single photo that told the story like this one. She wasn't letting go of that package for anything, not even to fix her dress, ha ha!

Sometimes it's so worth digging through your older supplies. I couldn't believe how well the holly and the lace matched these papers from Authentique.


I broke up the Zva pearls to place around the page.


I used some lace tape from Love My Tapes as a border around the paper. This ivory was the perfect shade.


I love all the so-usable-die-cuts that came with this collection.


What Christmas papers are tickling your fancy this year?

Supplies:
PP, die cuts, mini-letters - Authentique
flocked letters - My Mind's Eye
lace - Prima Marketing (green), Love My Tapes (ivory)
holly embellishments - Making Memories
pearls - Zva Creative
ink - Ranger
marker - Faber-Castell PITT pen

Tuesday, September 13, 2011

Sketchabilities


I'm happy to say that starting in October, I will be part of the Sketchabilities design team. (The timing will be perfect, as that is when I will be finishing my term with Let's Capture These Sketches.) I am delighted to be joining such an international group as these talented ladies:

Bellaidea vel Aginszka--Canada
Camilla Borossi--Brazil
Christin Gronnslett--Sweden
Erika Tesoro--Italy
Etsuko Uchida--Japan
Helen Tilbury--South Africa
Janice Daquila Pardo--USA
JJ Sobey--Canada (hey - that's me!)
Kay Fatula--USA
Keren Tamir--Canada-Returning
Kim Kendell--Austrailia
Leanne Allinson--Austrailia-Returning
LaQuette Akins--USA
Mary Ann Jenkins--USA
Margrethe Aas Johnsen--Norway
Mariko Hisazumi--Japan
Marina Johan--Singapore
Michelle Wedertz--USA-returning
Sheila Burns--USA
Valerie Charlot--France

Monday, September 12, 2011

Say What? - LCOM Sketch challenge #99


Have you seen this week's sketch challenge over at Let's Capture TheseSketches? Don't forget to pop on over and see what the rest of the team has created.

I customized this older chipboard shape, from Riff Raff, quite a bit. It was wider and shorter, with a Christmas holly in it, when I started. I cut it apart, then primed with gesso and painted with Tattered Angels Glimmer Glaze. I was rough about the priming, getting it lumpy on purpose, so that the finish would be more shabby. I'm quite pleased with the effect. (I saved the lovely holly shape for a future layout).

The pink borders were punched with a MS punch, then pleated. I added Love My Tapes lace over top. I'm also totally loving those spool top wooden buttons from this collection - makes this seamstress' heart go pitter-patter. :)


I was pleased to find out these older Pink Paislee letters (both styles) matched this collection so well!


Supplies:
PP, chip letters, mini letters, spool buttons - Pink Paislee
chipboard frame - Riff Raff
lace - Love My Tapes
pearls - Prima Marketing (flourishes), Basic Grey (flower centres)
glimmer glaze - Tattered Angels (Hawaiian Hibiscus)
gesso - Liquitex
markers - Faber-Castell PITT pen

Friday, September 9, 2011

Drippage - Tattered Angels


For this 'Mist-ables' Tattered Angels layout, I started with kraft paper from Hambly Screenprints. Did you know that their screen prints resist glimmer mists? They are a perfect match. (You don’t always have to seek out papers specifically printed with a resist – you may already have Hambly or other ‘resistables’ in your stash).

I misted the background with Apricot Nectar Chalkboard and Granite Glimmer mist. Once it was dry, I added spritzes of Lily Pad and Pop Rocks mists.


I also misted canvas die-cuts in Lily Pad, and added machine stitching for contrast.


The canvas tag (from Canvas Corp) was misted in Apricot Nectar Chalkboard. Then I dug into my stash of scraps for the patterned papers, and customized them with more mists. The green was masked with a Pink Paislee stencil and misted with Lily Pad. The music note paper was misted with Old Lace.

Speaking of lace – the self-adhesive lace here (Love My Tapes) was misted with Pop Rocks. It’s easy to mist self-adhesive items like this lace and washi tapes for example – stick them down to your misting mat, mist, then let dry. Then you can peel and stick to your project as usual.

The grungeboard letters were misted with Lily Pad. This gorgeous chipboard shape from Dusty Attic was primed with gesso then sprayed with Grape Ape Chalkboard. It isn’t necessary to prime chipboard, but it gives a whole new effect.


And the story...


Supplies (Tattered Angels):
Glimmer Mist - Granite Glimmer mist, Lily Pad, Pop Rocks, Old Lace
Chalkboard Mist - Apricot Nectar Chalkboard , Grape Ape Chalkboard

Other Supplies:
PP - Hambly Screenprints, Crate, 7 gypsies, Scrap Within Reach
mask - Pink Paislee
lace tape - Love My Tapes
canvas tag - Canvas Corp
chipboard - Dusty Attic
gesso - Liquitex
marker - Faber-Castell PITT pen
other - canvas scraps, sewing thread

Wednesday, September 7, 2011

1 Product, 3 Ways - Quick Quotes Frosted Embellishments

Recently, the owner at my local scrapbook store (Scrapbook Centrale) gave me a couple of Quick Quotes Frosted Embellishments and asked me to make a couple of tags to be displayed near the product in the store. She felt that customers weren't seeing the real potential in these items, and I had to agree with her, so I took up the challenge and here are the results.

Here is what they look like in the package:


I guess even the manufacturer realized they don't photograph well, because here's the image they use in their webstore:


These are intended as one-use embellishments - you stick it to your project and away you go. Well, I'm going to +1 that. I used the 1 dragonfly I received 3 times, because that's how I roll. They are made out of a frosted plastic material similar to that you see in many masks, including the Tattered Angels glimmer screens, so you can see where this is going...


I started by removing the gems so the shape would be easier to clean afterward. I placed the dragonfly shape on my misting mat, sprayed it generously with Glimmer Mist, then flipped it over on to the white tag, using it as a stamp. I did not lift the shape - because the next thing I did, was proceed to use it as a mask, and glimmer misted the entire tag in purple mists. I lifted the mask, and allowed the tag to dry (then I washed the dragonfly embellishment, to get it ready for the next tag).

You can see in this image I added a little clear crackle paint to parts of the tag, for texture.


I coated the completed tag in Chandelier Glimmer Glam (a girl can never have too much Glam, right?). I tried to catch it in the light so you could see how much it shimmers.


Supplies (stamped tag):
frosted dragonfly - Quick Quotes
CS - Bazzill
glimmer mist, glimmer glam - Tattered Angels
clear crackle paint - Ranger
other - organza ribbon

OK - on to the next tag. I'll be honest, this one is my favorite of the bunch, and I could have stopped there (but I didn't).

I started by painting the cardstock with regular gesso, and heat dried it. Then I placed the dragonfly as a mask, and used a palette knife to layer impasto gesso over top. I pulled up the dragonfly and cleaned it well (if you let the gesso dry on the mask, you will likely never get it off).


I won't lie - this is something you'll have to let dry overnight, but it's worth it. When it was about half dry (dry to the touch, but you could tell the underneath layers weren't dry), I mashed a couple of rubber stamps into it, to create texture.


The next day, when it was completely dry, I misted it generously with 2 colours of glimmer mist (Dragonfly - of course - and Gumdrop).

When the mist was dry, I added Glimmer Glam to the dragonfly impression:

I love how this looks in the sunlight!


Supplies (mask with gesso):
frosted dragonfly - Quick Quotes
CS - Bazzill
gesso, impasto gesso - Liquitex
glimmer mist, glimmer glam - Tattered Angels
other - random rubber stamps

Here's the next one - this time I used the embellishment as an actual embellishment, ha!


For this tag I misted the cardstock with glimmer mist, and stamped with Tattered Angels texture stamps. Then I painted Glimmer Glam (in 2 colours) onto the frosted dragonfly embellishment. Now, if I had taken my time and been neat about it, there wouldn't be dried bubbles of glam. But I like that look, so I just glopped it on. (Hmm, spell check says that 'glopped' isn't a word, but I think it should be.)


I love the way the glimmer pools in the texture on the Bazzill cardstock. I adhered the dragonfly to the tag with clear adhesive foam to give it a little lift, and then re-attached the gems with glue dots.


Supplies (Dragonfly tag):
frosted dragonfly - Quick Quotes
CS - Bazzill
glimmer mist, glimmer glam, stamps - Tattered Angels
stamping ink - StazOn
baker's twine - Pink Paislee

I said 3 ways, right? Well, I lied. It's 3 + 1. Since this is a different embellishment, I'm not counting it in my original tally. So there.


I realized I hadn't shown one of the easiest ways to customize the frosted embellishments, and that is with alcohol ink (I used 3 shades of alcohol ink, plus a bronze mixative).


The gems started out clear on this flourish. I coloured them with a Copic marker to give them a warmer tone, coordinating better with the other colours on the tag. I attached the flourish with tiny staples.


Supplies (kraft tag):
frosted flourish - Quick Quotes
CS - Bazzill
alcohol ink, distress ink - Ranger
stamps, staples - Tim Holtz
marker - Copic
glimmer mist - Tattered Angels
stamping ink - StazOn
other - twine

So tell me - is this kind of post helpful/useful? Should I do this more often? I would like to know what you think!